
Using Brand Kits for Social Media Images with Talkty
Learn how to set up a Talkty brand kit, create on-brand social media images and captions, review drafts, and prepare approved posts for publishing.
By Emily Carter · · 5 min read ·

Using brand kits for social media images helps you keep your visuals and captions consistent without rebuilding your brand details for every post. In Talkty, the Brand kit guides AI-generated images and copy, while templates place text and logos in the design. Set up your details once, create drafts in the Studio, then review and approve them before publishing or scheduling.
What a brand kit does in Talkty
Talkty’s image studio uses your brand kit to prepare social media post images and captions. The kit can include your tagline, industry, target audience, business description, website, phone, address, main brand colour, tone of voice, default button text, hashtags, logo and logo size. Your business photos can be used as backgrounds in photo templates.
The template—not the image-generating AI—draws the text and logo in the image. This helps keep your logo and colours in place and prevents text from being rendered as part of an AI-generated picture. Choose business photos without text, such as a product or workplace image, for cleaner backgrounds.
You can prepare designs before connecting a social media account. To publish, you need to connect an account. The Studio supports preparing content for Instagram, Facebook and YouTube, and sending videos to TikTok.
Set up your brand kit
- Open Social Media › Studio and select Brand kit at the top.
- Add your short tagline, Industry, Target audience, and What you do. The business description is especially useful because AI relies on it when preparing content.
- Enter your website, phone and address if you want them included in your business details. Add your Main brand colour, Tone of voice, default button text and hashtags.
- Upload your logo and set its size. A transparent PNG is recommended.
- Add business photos for use as backgrounds in photo templates. Choose images without text, such as photos of your products or workplace. You can also generate a photo with AI.
- Click Save.
If you have a website, you can use it to help fill in business details. The same brand information can also be edited in Settings › Business profile; changes there and in the Studio are shared. In the business profile, enter the website and choose Fill from site to receive suggestions for empty fields. Check the suggestions before saving.
Add guidance for more reliable content
The Knowledge bank appears below the brand kit. Use it to guide what AI may say and what it should avoid. Empty sections are not used; if they are all empty, AI uses the brand details above.
- Verified facts: Add exact details that posts may mention, such as services, packages, durations or opening hours. Each fact needs a source: a web address or Business statement. You can choose Suggest from website and add correct suggestions individually with Add. Suggestions you do not add are not used.
- Never write: Enter claims or phrases the AI should not use, one per line.
- Worn-out angles: List themes or wording you have used too often. Give each angle a name and separate its related words with
|. - Topic pool: Add subjects you want to post about. The autopilot uses unused topics first and records the date beside a topic it has used.
- Form of address: Choose informal or formal address, or leave it as Not set so the AI decides based on your tone of voice.
You can also record dislikes with I don’t like this on a draft. The latest feedback is passed to the writer and auditor, and you can edit or delete it. If the same complaint comes up again, Talkty may ask whether to turn it into a permanent rule. Review the wording before adding it to the brand kit.
Create a design from the Studio
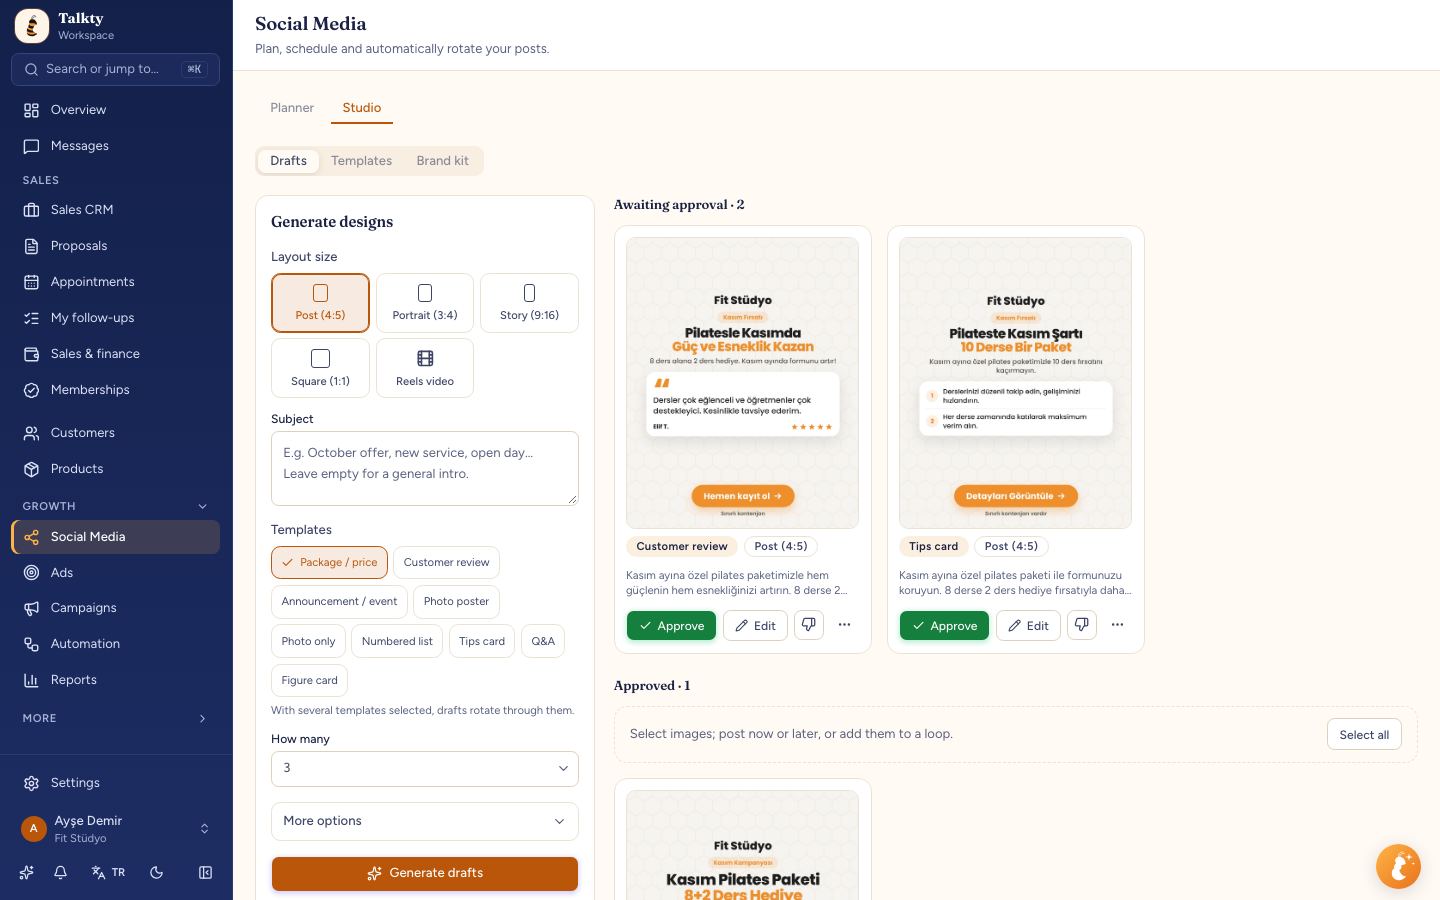
- In Social Media › Studio, open Drafts.
- Use the Generate designs form on the left to prepare a design. The gallery on the right shows designs under Awaiting approval and Approved.
- Review the image and the first lines of its caption. If a draft needs changes, choose Edit, adjust the text, caption, typeface or logo position, then select Save and redraw.
- To give feedback about an image or its text, choose I don’t like this and describe what should change. For a targeted rewrite, open More actions (⋯) and choose Regenerate with a fix, then give a clear instruction, such as asking for a shorter headline.
- Select Approve when the draft is ready. It moves to Approved.
The Studio uses AI, but check each draft before approving it. A warning may appear if a draft includes an unsupported number or claim. Verify the wording and correct it when needed.
Approve and prepare posts for publishing
In the Studio gallery, approved designs appear below drafts awaiting approval. Select Pick on an approved card, or choose Select all above the approved designs. Once you have picked a design, a publishing box opens at the top. Choose Publish now, Schedule for later, or Add to a loop.
You can also use the approved card’s More actions menu to choose Move back to drafts or Use in an ad. On a draft card, Use in an ad opens the new-ad wizard with that image selected. You need a connected social media account to publish; creating and reviewing designs does not require one.
For video content, go to Drafts › Generate designs › Layout size and choose Reels video. For a broader walkthrough of creating posts and captions, see Designing Social Media Posts Easily with Talkty.
Keep the workflow practical
Start with accurate business details, a clear logo and useful background photos. Add verified facts when a post needs precise information, and use Never write for claims you want to exclude. Then review each generated design, make edits where needed, and approve only content that is ready to publish.
If your brand changes, update the Brand kit or the shared business profile and save the changes. For more detail on how business information is used across Talkty, see the Business profile guide.
Summary
A Talkty brand kit gives the Studio the business and visual details it needs to create social media images and captions. Set up the kit, add any content guidance, generate designs in Drafts, and review and approve them in the gallery. Pick approved designs to publish now, schedule for later, or add to a loop.
Frequently asked questions
- Where do I set up my Talkty brand kit?
- Open Social Media › Studio and select the Brand kit tab. You can also edit the same business details in Settings › Business profile.
- Does AI draw the text and logo inside a social media image?
- No. The template draws the text and logo in the image. AI prepares the content and image elements based on your brand kit.
- Can I create designs before connecting a social media account?
- Yes. You can prepare and review designs in the Studio before connecting an account. You need a connected account to publish.
- How do I schedule an approved design?
- Select Pick on an approved card, then choose Schedule for later in the publishing box that opens at the top.
- How can I tell AI which claims to avoid?
- Add phrases or claims to the Knowledge bank’s Never write section, one per line. You can also give feedback on a draft with I don’t like this.
Emily Carter