
Tracking Sales and Payments Efficiently with Talkty
Learn how to record sales, track payments and balances, review collections, and connect finance records to customer opportunities in Talkty.
By Emily Carter · · 6 min read ·

Keeping sales and payments in separate spreadsheets can make it harder to see what has been paid and what is still due. This guide explains how to track sales and payments efficiently in Talkty’s Sales & finance area, and how to connect a sale to the right customer opportunity.
What Talkty tracks for each sale
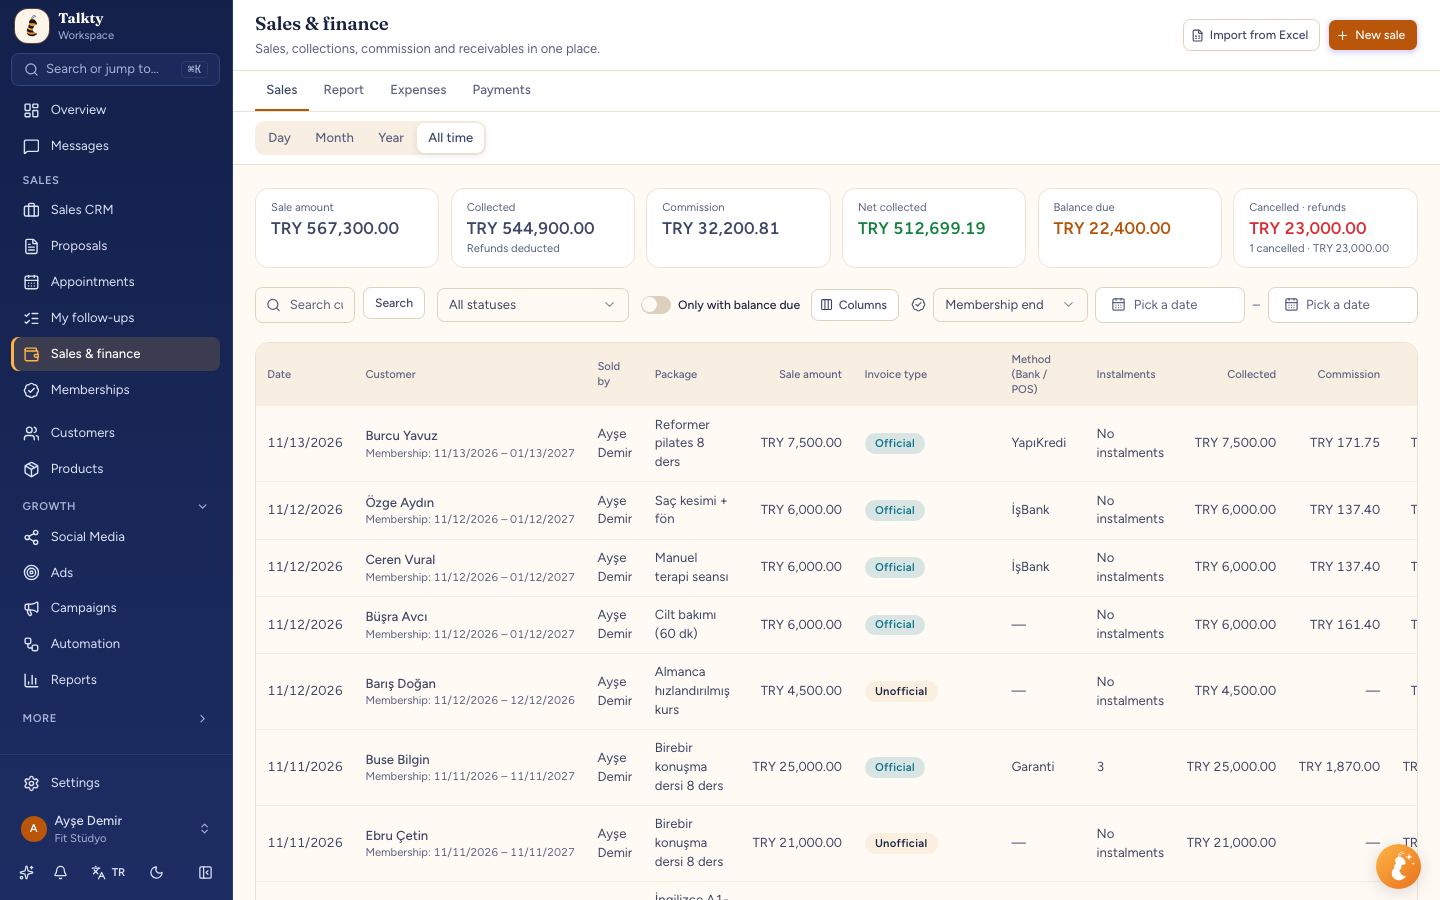
Open Sales › Sales & finance to work with the sales and payments ledger. The page has four tabs: Sales, Report, Expenses, and Payments.
In Sales, choose Day, Month, Year, or All time below the tabs. The page opens on All time. In Day or Month view, use the arrows to move between dates or months. The list includes sales made in the selected period and older sales that received a payment during it.
A sale can show the customer, package or products, sale amount, invoice type, payment method, instalments, paid amount, commission, net collected, remaining balance, and next payment date. Use Columns to show or hide optional columns. Your choice is remembered in that browser; Date and Customer always remain visible.
Record a sale and connect it to a customer
Use New sale in the Sales tab. If the customer already has an opportunity, search for it in Opportunity and select the correct record. Talkty links the sale to that opportunity. If you do not select an existing opportunity, Talkty creates a new contact and opportunity in the sales flow and column you choose; Won is the default column.
If the chosen column has required fields, complete them before saving. If you choose a follow-up column, a follow-up form opens after the sale is saved. Completing that form moves the opportunity to the follow-up column. If you cancel the form, the opportunity stays in the sales flow’s first column.
Choose the product or package, enter the sale details, and select the invoice type and payment method. The discount field in this sale form is the amount taken off the sale price; check To pay for the amount the customer will pay. For a membership sale, the membership start and end dates appear under the customer’s name.
If a search returns no opportunity, check the spelling before creating a new record. A missing result can be caused by a name being entered differently. If the product list does not load, use Retry when the warning appears. If you have no products, Add product takes you to Products.
For a sale already linked to an opportunity, you can also open its opportunity and choose Record sale. The customer is selected for you, so this does not create another contact or opportunity. For more on keeping customer records organized, see Organizing Customer Info in a Sales CRM with Talkty.
Add payments and understand the dates
Open a sale’s details to use Add payment when you receive a later payment. The date the payment is received determines which period it appears in—not the date the original sale was made.
This distinction also applies to the figures at the top of the Sales tab. Collected and Net collected are based on payments received during the selected period. The sale amount and Remaining figures are based on sales made during that period. For example, when a customer pays for an earlier sale, that payment is counted in the period when it arrived, and the sale appears in the list. Under the Collected column, This period: … shows the amount received in the selected period.
The Payments tab gives you a row for each payment received in the selected period. Each row shows details such as the date, customer, package, seller, amount, invoice type, method, instalments, and commission. Select a row to open the sale details, where you can correct or delete the payment. If the sale is not appearing because of the search or filters on the Sales tab, clear those filters first.
Review collections, balances, refunds, and expenses
Use Report for a summary of the selected period. It includes sale amount, credit card commission, net collected by card and by cash or transfer, and remaining revenue. Cancelled sales are excluded from the sale amount and count. Payments kept as a deposit remain in collections.
Refunds are deducted from net collected in the month the refund was made, rather than the month of the original sale. The Cancelled · refunds card shows the refund total. When the selected period includes refunds, the Collected card shows the amount after refunds and notes Refunds deducted. The Collected column in the sales table shows each sale’s collections before refunds.
Record costs such as rent, salaries, and bills in Expenses. Add a type, payment method, and note; expenses are deducted from net income in the report. The report also includes breakdowns by bank and by representative. Partner share distribution is calculated from net collected minus expenses and is visible to managers.
Set up payment methods and card commissions
To configure the banks and card commission rates used in sales records, go to Settings › Sales & CRM › Finance. Add the banks you use under Banks and POS. Commission applies to banks marked Card / POS; it does not apply to cash or transfers.
Use Commission table to set rates by instalment count. You can also set bank-specific rates. In the sale form, choose the payment method from the Bank / POS list, where cash or transfer and card or POS are separate groups. The selected method and applicable commission details can then be reviewed in the sales and payment records.
Step-by-step: a simple tracking routine
- Open Sales › Sales & finance and select the period you want to review.
- In Sales, choose New sale and search for the customer’s opportunity. Select it if it exists; otherwise enter the sale and choose the appropriate sales-flow column.
- Add the product or package, sale amount, invoice type, and payment method. Check To pay before saving.
- When money arrives, open the sale and choose Add payment. Record each payment when received so it appears in the correct period.
- Review Payments to check individual receipts, or open Report to review collections, commissions, remaining revenue, refunds, and expenses.
- Use Columns in Sales to keep the table focused on the details you need to check regularly.
For a separate guide to setting reminders and follow-ups for your sales team, read Reminder Systems for Sales Teams: A Practical Guide.
Summary
Talkty’s Sales & finance area brings sales, received payments, balances, commissions, refunds, and expenses into one ledger. Link each sale to the right opportunity, record payments on the date they arrive, and use the Sales, Payments, and Report tabs for different views of your records.
Frequently asked questions
- Where do I find sales and payment records in Talkty?
- Go to Sales › Sales & finance. The page includes Sales, Report, Expenses, and Payments tabs.
- How do I link a sale to an existing customer opportunity?
- Choose New sale, search in the Opportunity field, and select the existing opportunity before entering the sale details.
- Which period includes a payment for an older sale?
- The period when the payment was received. Payments are counted by receipt date, not by the date the sale was made.
- Where can I review refunds and expenses?
- Use the Report tab for period summaries and the Cancelled · refunds card. Add business costs in the Expenses tab.
- How are card commissions configured?
- Go to Settings › Sales & CRM › Finance. Add banks under Banks and POS, then set rates in Commission table or configure bank-specific rates.
Emily Carter