
Ads
Creating an ad
Open a lead form, messaging, website traffic or sales ad; AI help on every step (goal, copy, image, audience, budget, form), preview; continue a draft.
The Ads › New ad wizard goes step by step. Once you type the ad name, every change is saved as a draft (the header shows "Draft saved"); if you close the window it stays in the list as Draft, and Continue picks up where you left off. If you changed something, Esc or clicking outside first asks "Close the wizard?".
Every step has an AI button; they're all optional, run only when you press them and use a few tokens. AI's suggestions are written into the fields and a short summary appears under the box; if you don't like them, change the fields by hand. A separate pane on the right of the window shows a preview of roughly how the ad will look in the feed; it updates as you type (on narrow screens it appears at the bottom of the copy, image and review steps).
1. Goal and content
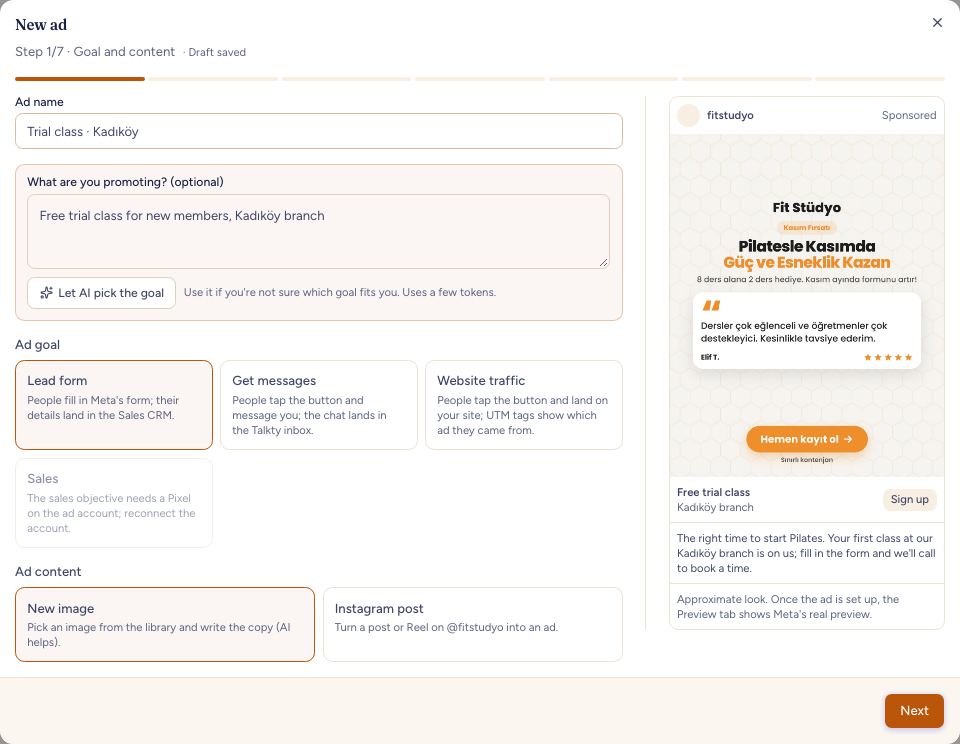
Type the Ad name (only you see it). If you're not sure which goal to pick, fill in What are you promoting? and press Let AI pick the goal: AI picks the goal and explains why.
Ad objective:
- Lead form: people fill in a form on Meta; their details land in the Sales CRM.
- Messages: people press a button and write to you; the conversation lands in your Talkty inbox. Where should messages arrive: Instagram DM, Messenger or WhatsApp.
- Website traffic: people press the button and land on your site.
- Sales: Meta shows the ad to people likely to buy (or take the event you pick) on your site. The ad account needs a Pixel; without one the option is disabled.
If you change the objective, fields you filled for the previous one (form, website URL) aren't deleted; a notice says they won't be used for the new objective.
Ad content:
- New image: pick an image from the library and write the copy.
- Instagram post: turn a post or Reel on your account into an ad; the post's own caption and media are used. Posts with copyrighted music or effects can't be promoted on Meta. You can pick up to 6 posts; each becomes its own ad in the same ad set.
2. Ad copy
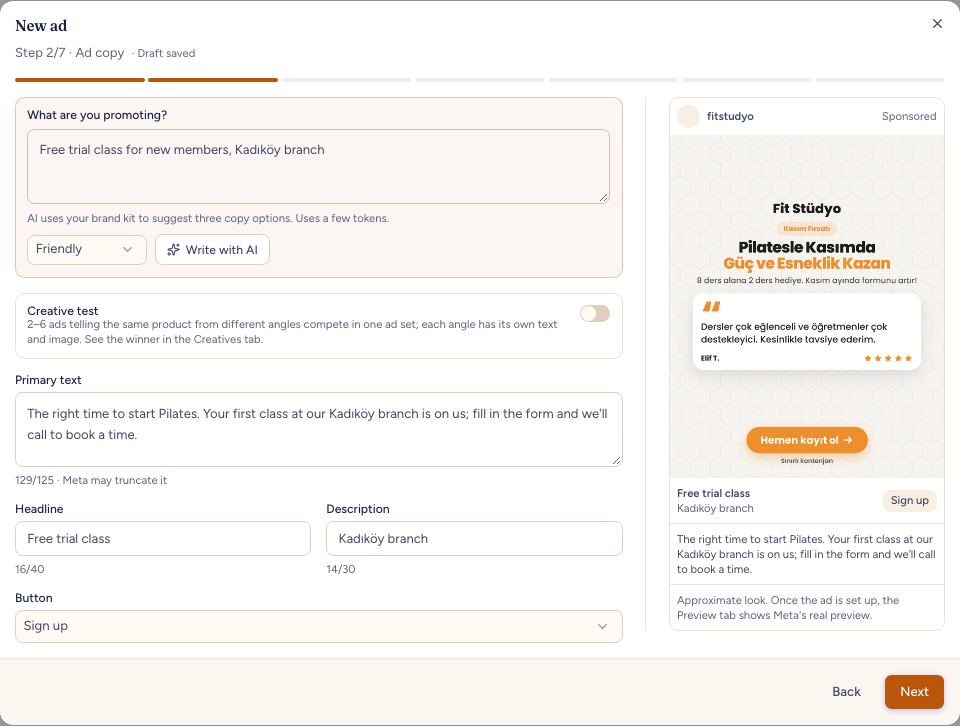
Fill in What are you promoting? (for example "A free trial class for new members, Kadıköy branch"; if you typed it on the first step it's already there). Pick a Tone (Friendly, Professional, Corporate, Direct, Sales-driven) and press Write with AI: it suggests three copy options from your brand details and the ad's objective and fills in the first; click another to switch. Not happy? Rewrite. If the copy contains phrases that may trip Meta's review (health claims, guaranteed results…), a warning appears below; you fix the copy before publishing.
Choose the primary text, headline, description and button; buttons depend on the objective (lead: Sign up, Get quote…; traffic/sales: Shop now, Order now…). The counter under each field shows Meta's recommended length (primary text 125, headline 40, description 30 characters); longer text isn't rejected but may be truncated.
Website traffic and Sales ads also take a Website URL (https://) and UTM tags; the tags are appended to the URL and show in your analytics tool that the visit came from this ad.
Creative test (optional)
With a new image ad, turn on Creative test and 2–6 ads telling the same product from different angles compete in one ad set: Problem, Benefit, Social proof, Offer / urgency, Curiosity / hook, Objection handling. When you turn it on, the text you wrote moves to the first angle; pick the angles you want to test (at least two). Write angles with AI writes a separate primary text, headline and description for each angle; edit them in each angle's box. The preview shows the angle you're working on. With the creative test off, the wizard works with a single text as before.
3. Image
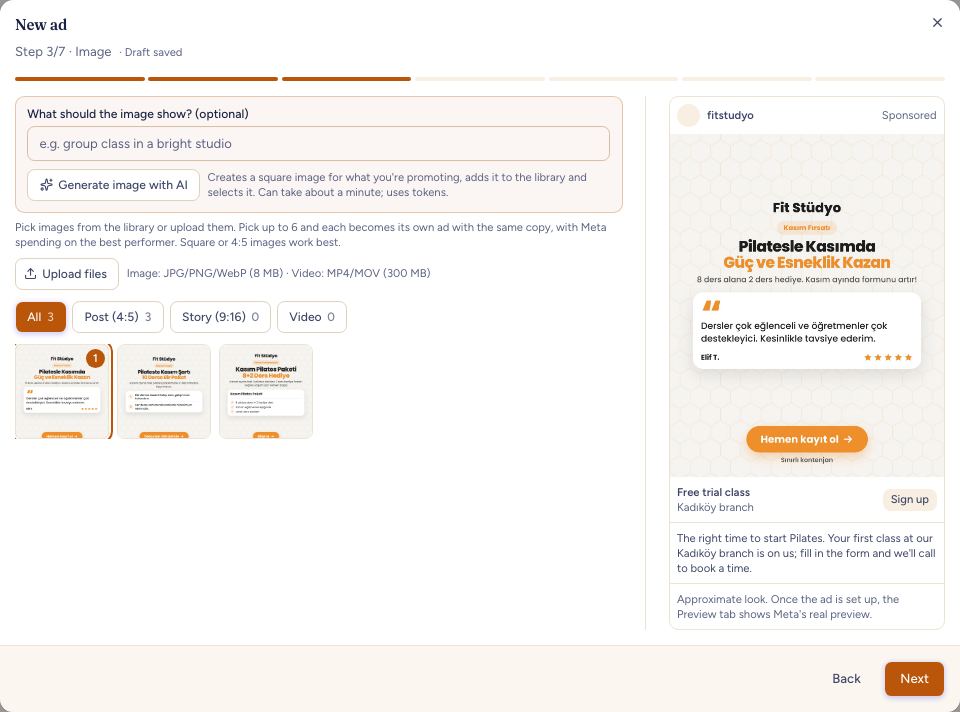
Pick an image from the library or add one with Upload file. Square or 4:5 images work best. If the uploaded image does not match the selected tab's shape, the list switches to the All tab, where it appears selected. You can use images made in the Studio.
You can pick up to 6 images. Each image becomes its own ad with the same copy, and all of them run in the same ad set on the same budget; Meta shifts the budget to whichever performs best. Testing a few different images together (product photo, customer photo, promo poster) usually beats starting with a single one. The preview shows the first image; Ads on the review step shows how many ads will be created.
In a creative test the image step has a button per angle; pick the angle, then choose its image from the library or generate one with AI (AI also uses the angle's headline). You can use the same image for more than one angle; then only the text is tested. An angle without an image shows a dot on its button, and Next stays off until every angle has one. Each angle becomes its own ad in Meta and the ad name carries the angle (e.g. "Spring campaign · Angle: Problem"); the report and CRM read it by that name.
On a Design Studio draft, Use in an ad opens the wizard with that image selected.
Video: instead of an image you can pick a video from the library (MP4 or MOV, up to 300 MB; the library's upload limit). Images and videos can be mixed; each becomes its own ad. The video goes to Meta by link; Meta downloads and processes it and picks the cover image itself. If Meta can't process the video within about 20 seconds, setup stops with "Meta is still processing the video"; press Retry a few minutes later to continue where it left off (the video isn't uploaded again). Vertical (9:16) videos look best in stories and Reels, square or 4:5 in the feed.
No image ready? Press Generate image with AI. AI creates a square photo without text for what you're promoting, adds it to the library and selects it (can take about a minute). Describe it briefly in What should the image show? (e.g. "group class in a bright studio") to steer it.
If you chose a video, Video cover appears below: pick an image from your library and it becomes the video's cover (in a creative test, on every video ad). If you don't pick one, Meta chooses a frame from the video.
4. Audience
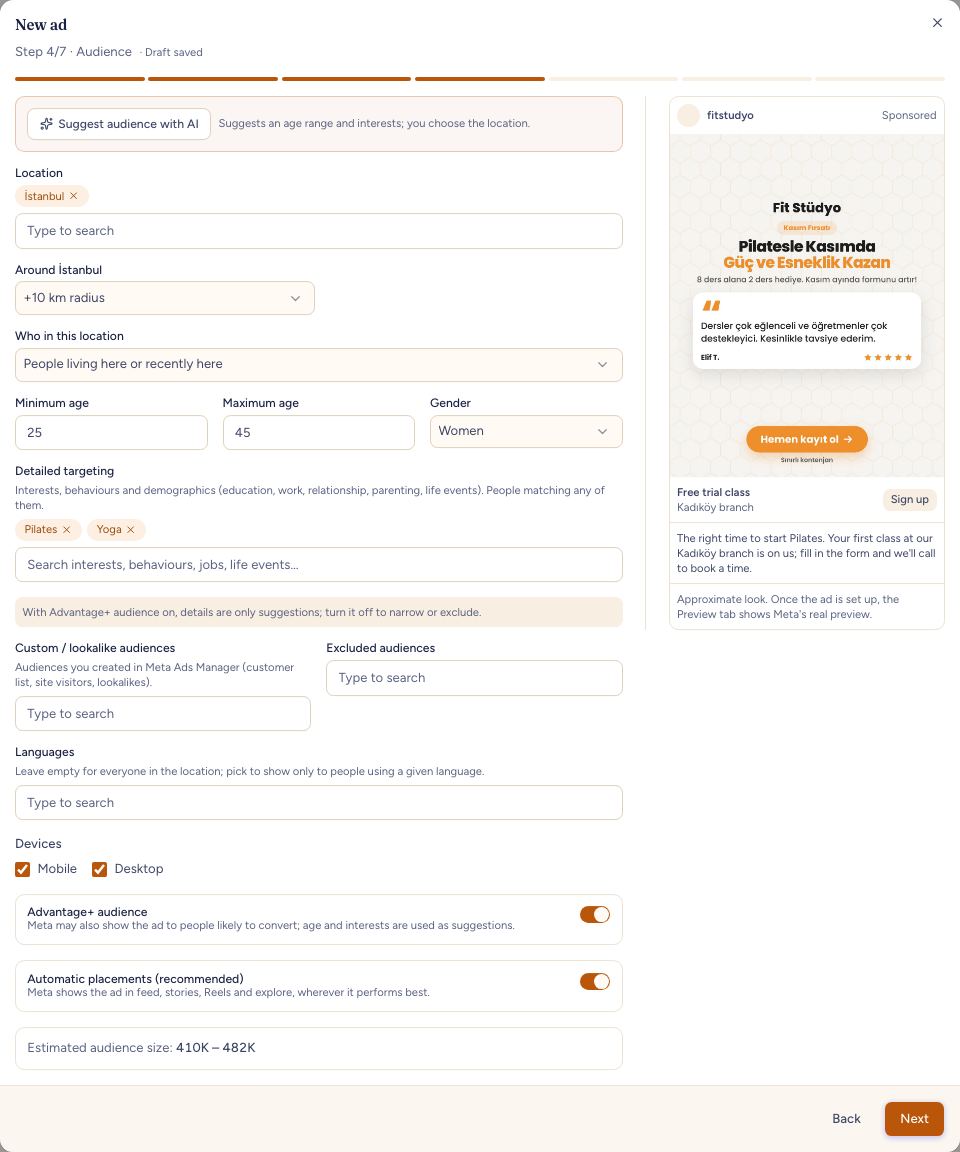
Suggest audience with AI suggests an age range and interests; interests are matched to ones found on Meta and added to Detailed targeting; Meta results whose name doesn't match the suggestion are skipped. You always choose the location. If you used AI on the copy step, the suggestion comes from there and uses no extra tokens.
- Location: country, region or city (at least one). For cities you can pick a radius (+10 km, +25 km…). You can't pick a country together with a region or city inside it (e.g. Turkey + Ankara): Meta rejects it, "These locations overlap" appears under the field and Next stays off until you remove one. Who in this location lets you pick people living here, people recently here, or both. If a search finds nothing, "No results" appears under the field; if Meta can't be reached (for example the ad account connection expired), an error with a reconnect hint appears. Detailed targeting, custom audience and language searches work the same way.
- Age range and gender.
- Detailed targeting: interests, behaviours and demographics (education level, job title, employer, industry, relationship status, parenting, life events). Search results show each item's type and estimated size; people matching any of them are targeted.
- Narrow audience: people must match one above and one of these (e.g. "Yoga" interest and "New parents").
- Exclude: people with these traits won't see the ad.
- Custom / lookalike audiences: target or exclude audiences you built in the Audiences tab or in Meta Ads Manager (customer list, site visitors, lookalikes). Audiences with the Exclude role in Audiences are removed from every ad automatically, even if you don't pick them (Audiences).
- Languages and Devices (mobile / desktop).
- With Advantage+ audience on, Meta may also show the ad to people it expects to bring more results; details then become suggestions, and narrowing and exclusions aren't available.
Estimated audience size at the bottom of the step updates with your choices.
Placements: with Automatic placements (recommended), Meta shows the ad wherever it performs best in feed, stories, Reels and explore; or choose placements one by one.
5. Budget and schedule
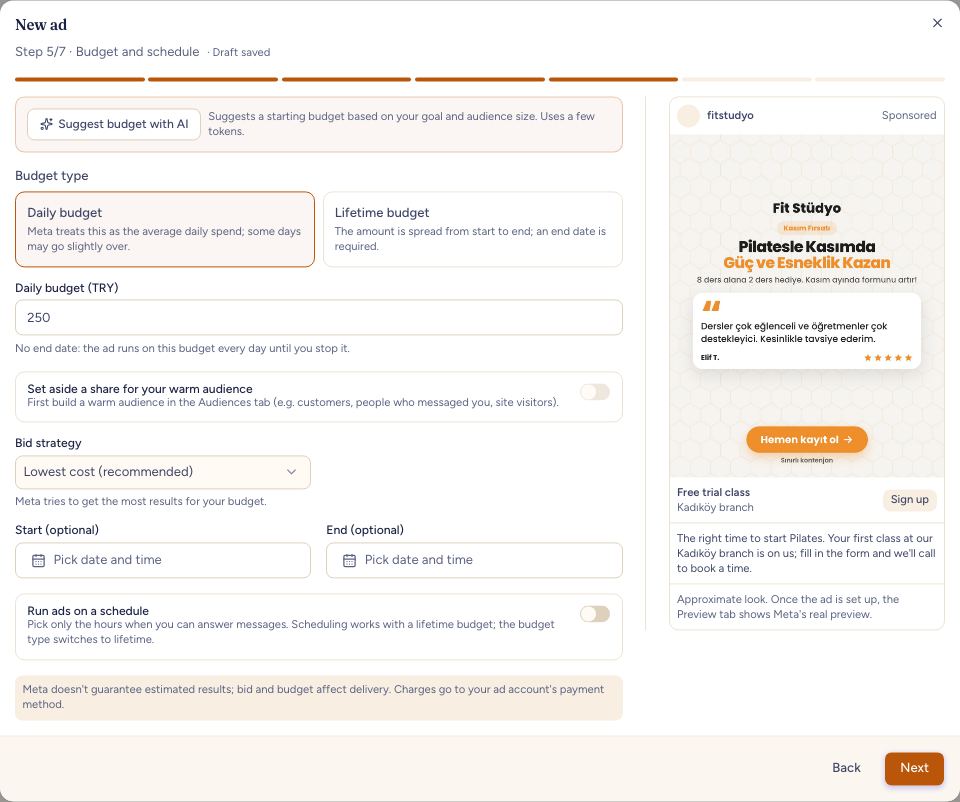
Not sure how much to spend? Press Suggest budget with AI: it suggests a daily starting budget and duration based on your goal, location and estimated audience size, and fills in the budget. The suggestion isn't a guarantee of results.
Budget type:
- Daily budget: Meta uses it as the average daily spend and may exceed it slightly on some days.
- Lifetime budget: the amount is spread from start to end; an end date is required.
Below the budget field you'll see the planned total spend (for a daily budget with an end date, multiplied by the number of days). The end date must be after the start and in the future.
Set aside a share for your warm audience: when on, two ad sets are created in the same campaign. The warm set shows only to the warm audiences in Audiences (people who know you), the cold set to new people; the warm audience is excluded from the cold set, so most of the budget goes to finding new customers. The share isn't a fixed ratio, it's suggested from the warm audience's size: enough for them to see the ad 2–3 times a week (calculated from the account's cost per impression over the last 30 days), at most 30%. If the account has no past spend, 20% is suggested to start. You can change it in Warm share (%) (at most 50%; an unreadable value disables Next); the two sets' amounts appear below. The budget you enter is the total. If you change the total budget later, all ad sets are updated in the same ratio; to change a single ad set's budget, use the Ad sets & ads tab.
For Sales ads choose the Conversion event (Purchase, Add to cart, Initiate checkout…); the event must come from the Pixel on your site.
Bid strategy: with Lowest cost (recommended) Meta tries to get the most results for your budget. Cost per result goal tries to keep the average cost under your amount, and Bid cap bids at most your amount in each auction; both may deliver less. Optionally set start and end dates. Meta charges the ad cost to the payment method on your ad account.
Run ads on a schedule: turn it on to run the ad only in the hours you pick, for example only when you can answer messages. Click or drag over the grid of days and hours, or start from a preset. Scheduling works with a lifetime budget, so the budget type switches to Lifetime budget (an end date is required); switching back to a daily budget turns the schedule off. Hours are in the ad account's time zone.
6. Lead form (lead ads)
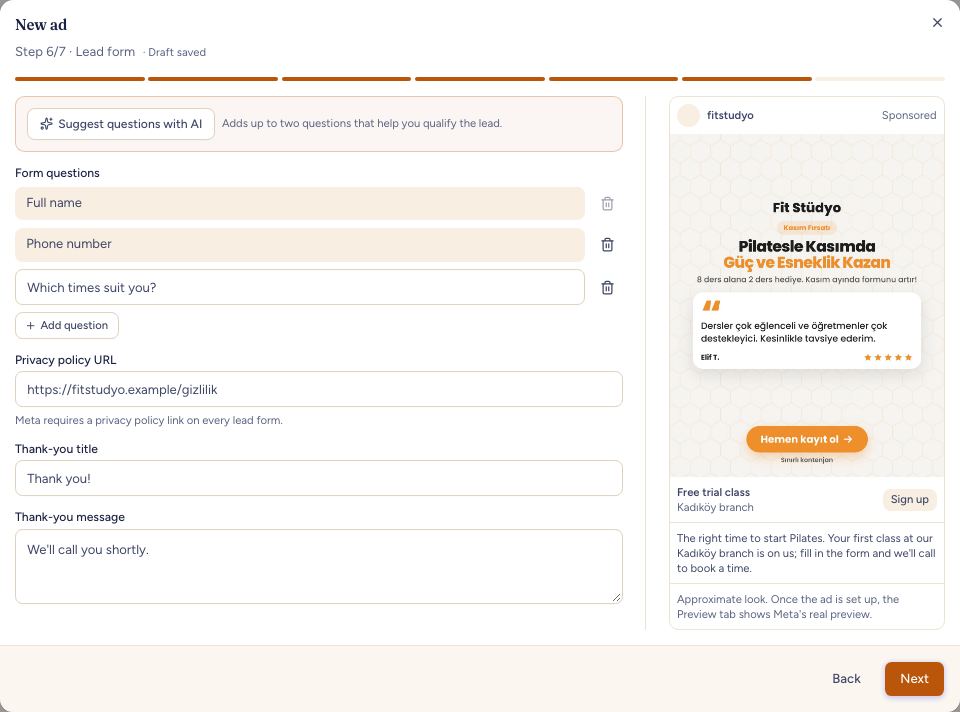
Choose an existing form or create one: questions (full name, phone, email, your own questions), a privacy policy address (required by Meta) and a thank-you message. The form opens in your workspace language; the thank-you page button goes to the website in your brand settings, or to your Facebook Page if there is none. Suggest questions with AI adds up to two questions that help you qualify the lead; it leaves the questions you wrote alone.
7. Review and publish
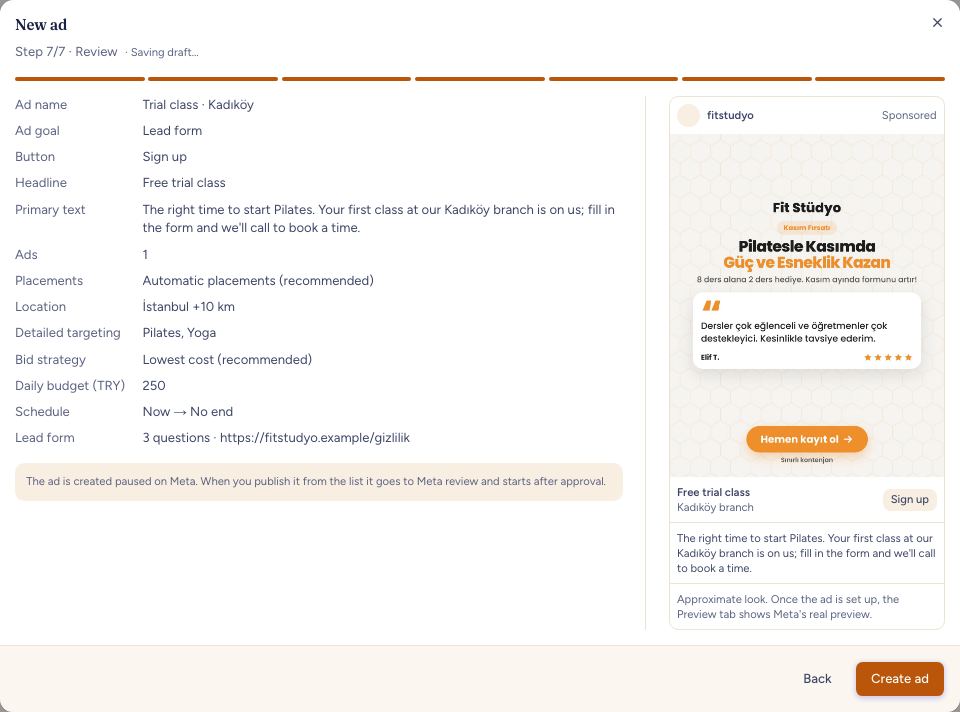
The Review step shows the objective, website URL, button, audience, budget and schedule, planned total and form together. Create ad sets the ad up in Meta as paused (the list first shows "Setting up in Meta", then "Ready to publish"). Pressing the button twice, or resending after a dropped connection, doesn't open a second ad. When you press Publish in the list, it goes to Meta review and starts after approval. If the setup stops halfway in Meta, the card shows Error with the reason in plain words (overlapping locations, Page permission, rate limit…; Meta's technical message in parentheses). Reconnecting is only suggested when the connection expired or a permission is missing. Try again only completes the missing steps and leaves the ad paused; it's enough for temporary problems. A campaign already set up can't be edited, so if the targeting or copy must change, Copy and fix opens a new draft with the same details; after you fix and create it you can delete the failed campaign. Press Publish afterwards to start it. In the review the lead form shows as "5 questions · privacy address".
For an ad built with an image, Policy check under the review checks the text and image against Meta's ad policies with AI (uses tokens). It looks for unsupported claims ("guaranteed", certain results), wording that implies personal attributes ("Overweight?"), false urgency, hidden terms, fake interface elements and before / after images. The result is Passed, Failed (with the problem phrase, a quote and a suggested fix) or Unknown. Unknown means the ad is in a special category such as health, finance or insurance, where Meta applies extra rules. Links to Meta's policy pages are shown below it. The check isn't a final approval; Meta makes the decision. The same button is in the Add ad window too.
Tracking results
Above the list are Search ads and a Status filter. The ad list and ad details show spend, leads received, cost per lead, sales, return on ad spend (ROAS) (not calculated when the ad account's currency differs from your workspace's; sales aren't converted), impressions, reach and clicks. Pause / Resume, change the budget (daily or lifetime, depending on the ad), Duplicate (opens a new draft with the same settings; nothing is created in Meta) and delete from here.
On the ad details Overview tab, pick a Period (Today, Last 7 days, Last 30 days, This month…); you'll also see CPM, Frequency, Link clicks for traffic/sales, and Purchases and ROAS per Meta for sales. If Meta returns no data for the period, it says so. CRM numbers (leads, sales) are always all-time.
The Report tab shows at which funnel step people drop off, compares the warm and cold sets and lists suggested next steps (Ad report and recommendations).
The Creatives tab compares the campaign's ads side by side and shows the winner (Ad sets and ads).
The Preview tab shows the ad with Meta's own preview by placement (Facebook feed, Instagram feed, stories, Reels); you can check it after the ad is created, before publishing.
The Leads tab lists people who came from the ad (Open opportunity goes to their opportunity). From the Follow-up tab you can schedule a bulk WhatsApp template message to them: now, after 1 day, 3 days or 1 week.