
Getting started
Welcome to Talkty: first-day setup
What Talkty does and which steps to complete on your first day.
Talkty collects every message from WhatsApp, Instagram, Messenger and the chat bubble on your website into one inbox. Your AI assistant can reply on your behalf, conversations turn into opportunities on your Sales CRM sales flow, and appointments, memberships, payments, campaigns and social media posts are managed in the same place.
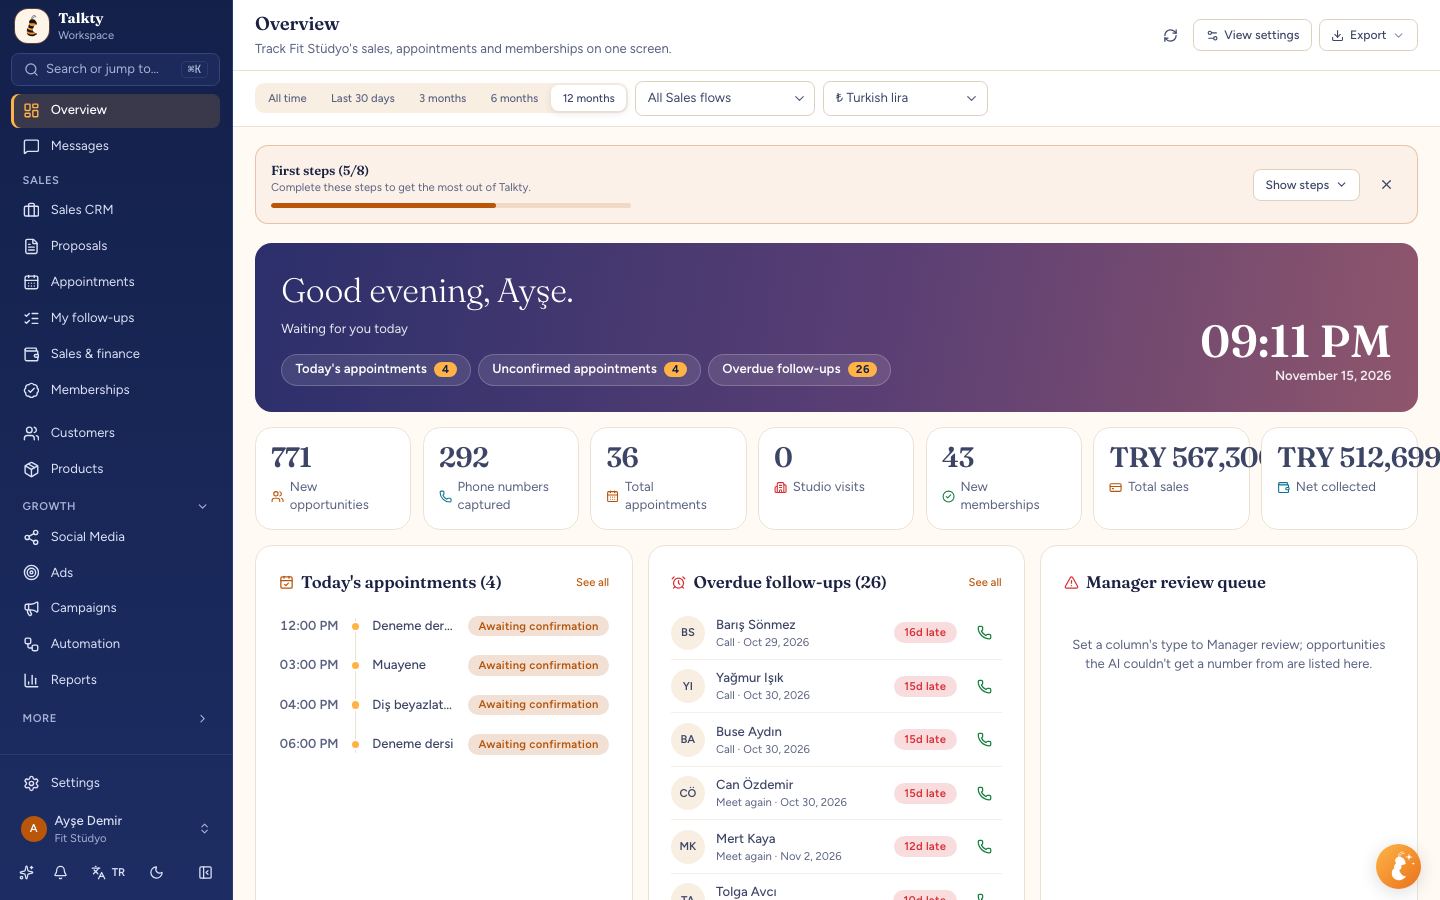
The Overview screen
When you sign in, Overview opens: today's summary, new messages, cards in your sales funnel and pending follow-ups. On a phone, the bottom bar gives you Overview, Messages, Sales CRM, Appointments and Menu.
At the top, the Daily brief greets you by time of day and shows what's waiting for you today: Today's appointments, Unconfirmed appointments, Overdue follow-ups and Records awaiting review. Only items with a count appear; tap one to open that screen. To hide or move the brief, use View settings.
Setup wizard
When you first open your account, the setup wizard opens on Overview and takes you through six steps; Step 1 of 6 and a progress bar show at the top:
- Welcome to Talkty: what your plan includes (on the Free plan: inbox, Sales CRM, AI assistant) and its limits (channels, contacts, users, monthly tokens).
- Your business: business type, what you sell, business name and website. When you press Next, your account is set up to match and your AI assistant is prepared from your website. See Business type and ready-made setup.
- Connect your messaging channel: WhatsApp, Instagram, Messenger or website chat. Connect opens that channel's connect screen; when you're done, the Back to setup bar at the top of the screen brings you back to the same step. Connected channels are marked Connected.
- Create your AI assistant: Create assistant (or Edit and test … if you already have one) opens the assistant page. Write the instructions and general details there and ask a question like a customer in the test chat; the assistant finds products and prices on the Products page itself. The test chat doesn't reach customers or create records; replies use AI tokens. When you're done, the Back to setup bar brings you back to the wizard; a tested assistant is marked Assistant tested. See Create an AI assistant.
- Add your contacts: import a CSV file, or use Open Contacts to add people one by one.
- You're ready: a table comparing plans feature by feature. Choose this plan opens the subscription screen with that plan's price (payment only starts once you confirm); Continue for free finishes the wizard.
You can move past any step with Skip this step, or close the wizard with Later. An unfinished setup reopens at the same step from Continue setup on the First steps card. The workspace owner and admins see the wizard.
First steps checklist
The First steps card below the filters on Overview lists, in order, what you need to run your business's daily work in Talkty. The card stays compact with a progress bar; press Show steps to see the steps. Clicking a step opens the related screen, and the How? link next to it opens that step's help article. A step is only completed, and crossed out, once you have actually done it. Only the steps your plan includes and your role can do are listed.
- Enter your business details: type your business name. The step is done once the default "… Portalı" name given at sign-up changes or a business name is entered in your business profile. See Business profile.
- Add your first customer or import your list: add a customer or upload your Excel/CSV list. See Customers and import.
- Book your first appointment: create your first appointment on the Appointments screen. See Appointments and Google Calendar.
- Record your first sale (membership/package): enter a membership or a sale record. If the Memberships module is off, the step goes to the Finance screen. See Memberships.
- Connect WhatsApp or Instagram: see Connecting WhatsApp and Instagram and Messenger.
- Set up and try your AI assistant: create the assistant, then write to it like a customer in the test chat on the assistant page; the step is done after the first try. See Creating an AI assistant.
- Invite a teammate: the step is done once you send an invitation. If your plan allows a single user (Free), this step isn't listed. See Team and roles.
- Look at your first weekly report: the step is done once you open a report on the Reports screen. See Reports.
The list follows your What do you sell? choice. If you didn't pick Appointments (or Projects / proposals), the Book your first appointment step doesn't appear. If you picked Products or Memberships / subscriptions, an Add the first product or package you sell step comes after the customer step; it is done once you add your first item on the Products page (see Companies, products and proposals). If you don't sell memberships, the sale step goes to the Finance screen. Without a choice the list is as above.
In a new account the business type window opens by itself on first sign-in; you can change it later under Settings › Business & brand › Business profile. See Business type and ready-made setup.
When every step is done, the card is replaced by a short Tip: one a day about overdue follow-ups, the brand kit, ad forms, quick replies, reports and more. Next tip moves to another one and Open opens the related screen.
You can close the list or the tip with Hide list (the cross).
Let us set it up for you
If you'd rather not do the setup yourself, the same card offers Let us set it up: for a one-time fee our team sets up your channels, AI assistant and Sales CRM. After ordering, you complete the payment under Settings › Billing & plan › Subscription › Payments.
Giving our support team access
If we need to look at something together, use Grant support access at the bottom of the card to give our team 14 days of access. You can end it at any time with Revoke access. While our support team is in your account, a banner appears at the top of the screen. Our support team doesn't appear in your Team & roles list, people pickers or automatic assignment, and doesn't count toward your user limit; what they do is shown in System records.
Tip: if you're not sure what to do on a screen, open the Help center from the account menu at the top right.