
Sales CRM
Sales CRM: sales flows and stages
Manage your sales process by moving opportunities between stages.
The Sales CRM is a sales flow where each customer or request is a opportunity that moves left to right through stages (columns). For example: New → Called → Appointment booked → Attended → Won / Lost.
When a new person writes on WhatsApp, Instagram or web chat, their opportunity is usually opened automatically. To open one manually, press New customer.
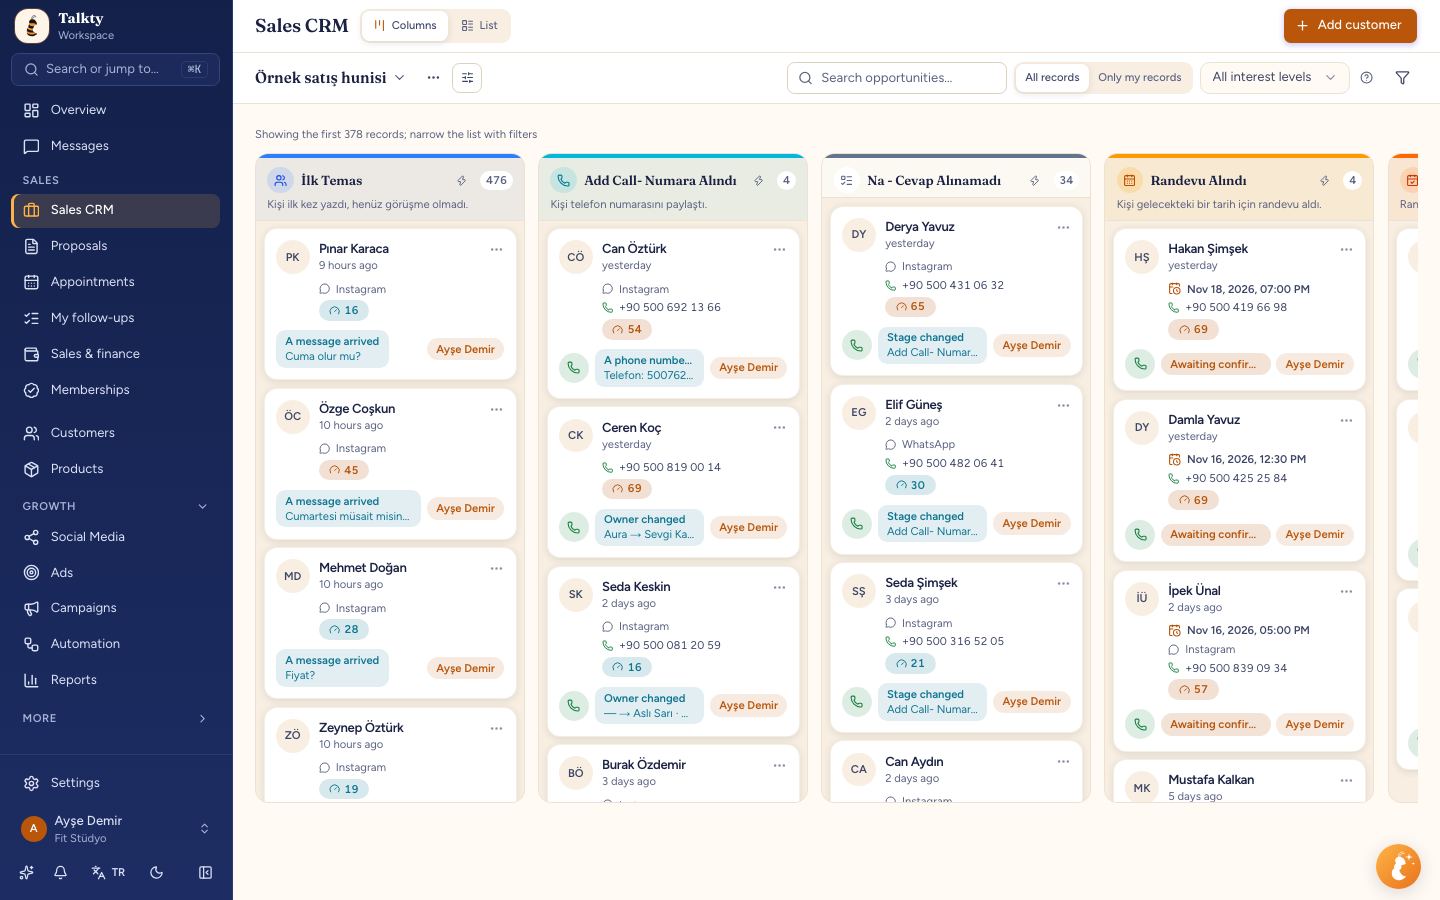
Creating a sales flow
- On the Sales CRM page, press Create sales flow in the sales flow list and name it (for example "Corporate sales").
- Start with ready stages using Add pipeline columns, or create your own with Add column.
- Open separate sales flows for different branches or teams. Copy a sales flow as a template to reuse its stages on a new sales flow.
Moving opportunities
- Opportunities in a column are sorted by last activity: an opportunity that is moved, edited or updated by AI rises to the top of its column.
- Drag an opportunity and drop it in another column. With a keyboard or on a phone, use Move to column in the opportunity's ⋯ menu.
- Managers send an opportunity to another sales flow with Move to sales flow in the opportunity's ⋯ menu: it lands in the matching column in that sales flow (or its first column), and whoever moved it becomes its owner. If that column asks for follow-up details, required fields, a lost reason or a sale, the same windows as a column move open here too; cancel and the opportunity stays put. To hand an opportunity to a rep, use Transfer to rep.
- If required fields are set for a column, you're asked to fill them in before the move (for example "Next follow-up date"). The window shows all of the column's required fields; filled ones come with their current values and you can change them if needed. Empty ones are marked Missing. When an opportunity moves to Bugün Randevu (today's appointments), the appointment date comes filled with today's date and time; you can still change it. Dates and times are picked from a calendar with hour and minute selectors that opens in the app's language. The follow-up details selected under the column's Follow-up form (package of interest, stars, follow-up source, follow-up reason, next action, follow-up period, sales owner) are asked in the same window with the opportunity's current values. Fields with a red asterisk (*) are required; fields made optional in the column settings can be left empty; saving stores your changes and moves the opportunity. New text you type in Görüşme notu (meeting note) is also added to the opportunity's Calls › Notes with author and date, wherever it's saved from (this window, Opportunity details › Edit or Additional Information in the customer form). Each change adds a new entry and older ones are kept; an unchanged note isn't added again.
- To change the required fields of the opportunity's current column without moving it, choose Edit required fields in the opportunity's ⋯ menu (reps and managers; it only appears when the column has required fields). Save stores the fields and the opportunity stays where it is.
- Moving to Won or Lost opens a separate window. See Won, lost and loss reasons.
Rep sales flows and the main sales flow
You can give each sales rep their own sales flow:
- Open a sales flow for the rep; its columns link to their counterparts in the main sales flow automatically (see below).
- From the sales flow menu, open Rename the sales flow and choose the rep in Sales flow rep.
The rep only sees their own sales flow, and opportunities landing on it are assigned to them. The sales flow also joins the sales flows new contacts are distributed to in turn, so AI and auto-assignment spread new contacts across reps.
In a new account the first sales flow, named after your company, is the main sales flow. Managers see the opportunities of every sales flow together in the main sales flow; each sales flow's columns merge into their counterparts in the main sales flow and each opportunity shows its owner. In the main sales flow, use Transfer to rep in an opportunity's ⋯ menu to move it to a rep's sales flow: the opportunity goes to the matching column in that sales flow (or its first column) and the rep becomes its owner.
In the main sales flow, the column menu (move left/right, required fields, column type) and Add a new column edit the main sales flow's own columns; other sales flows' columns don't change. A column with no counterpart in the main sales flow appears at the end of the main sales flow without a menu; edit it on its own sales flow.
A column's counterpart in the main sales flow. A sales flow's column is linked to its counterpart in the main sales flow by identity, even if the names differ. The link is automatic: same column type first (for example "Randevular" in the main sales flow and "Randevu Alındı" in a rep's sales flow match if both are appointment columns), otherwise the same name. To choose it yourself, open the column's ⋯ menu in that sales flow and pick a main-board column in Counterpart in the … sales flow. In the main sales flow, opportunities show in that counterpart; Transfer to rep and Move to sales flow also use this link to reach the matching column.
To change the main sales flow, or to pick one in an older account, open Rename the sales flow from the sales flow menu and turn on Main sales flow. Only one sales flow can be the main sales flow; choosing another one clears the previous one. The main sales flow can't be deleted; make another sales flow the main sales flow first.
Views
Choose the view with the Columns · List buttons next to the page title.
- Columns (column view): each column is its own panel; the colored strip and header band at the top show the column colour (if none is picked, the colour of its type: appointment, appointment today, follow-up, won/lost). The column header shows the name, the number of opportunities, the description and the total value of the opportunities in the column (no total when opportunities use different currencies).
- List: all opportunities as a table; sort and export.
- Customize cards (the settings icon next to the sales flow name, in column view; the same button is also in the Card layout section of Settings › Sales & CRM › Sales CRM): choose which details appear on cards and where they sit. The window shows a sample card on the left and the field list on the right. Pick a position for each field: Top (under the name), Middle, Bottom or Hidden; use the arrows to change the order. The Name bubble (the initials left of the name) and Record code can only be shown or hidden. Bottom section lays out the bottom details Side by side or One under another. Owner appears as a tag on the right when the bottom section is side by side, and as a line anywhere else; for example, hide the name bubble and move the owner to the top so the opportunity reads from top to bottom. Last updated by (hidden at first) shows who did the latest action on the opportunity: AI if the AI opened it from a message, moved it or booked the appointment; a teammate's name if they booked the appointment or made a change. For example, if the AI opened the opportunity but a sales rep booked the appointment, the rep's name is shown. Booked by (hidden at first) shows who booked the opportunity's appointment: whoever created the appointment or first moved the opportunity to an appointment column (Randevu Alındı / Bugün Randevu); AI or a teammate's name. Automatic overnight moves don't count. It appears only on opportunities with an appointment and stays the same when someone else works on the opportunity later. It also shows in the panel that opens when you click the opportunity, under Customer info, below Last updated by. Owner can also be set to Left edge (vertical) or Right edge (vertical): the owner's name is written sideways on a coloured strip along that edge, starting at the top of the strip, with the tops of the letters facing out of the opportunity. The sample card updates as you change things. Save applies the layout to opportunities in every sales flow; it is stored only for you, so your teammates' opportunities don't change. Reset to default brings back the original layout.
- Import / export lets you download opportunities as Excel or CSV (Download as CSV) or upload a CSV from another system, mapping columns to fields. Each imported opportunity is linked to a contact in Customers: the existing one if the phone or email matches, otherwise a new one. The downloaded file uses the names and values you see on screen (opportunity name, column, status, source, owner name, local date and time) and can be uploaded back as is. In Kommo, Zoho or HubSpot files, common column names (Deal Name, Stage, Amount, Owner and so on) are matched automatically; choose the rest by hand. If you can manage Sales CRM, missing columns for the file's stages are created before the closing columns and listed in the preview; otherwise those opportunities go to the first column. Won and lost stages go to the column with that type. New columns have no type; you can choose one later.
Column settings
Open Edit column from the column header menu:
- Name, colour and icon: at the top of the window you set the column name, Column colour and Column icon. Left on Automatic, the colour and icon come from the column type (appointment purple, today's appointments orange, follow-up and won green, lost and cancelled red; columns without a type grey). A colour or icon you pick overrides the type default; the colour shows the same in the column's top strip, its header band and the opportunity's stage strip.
- General: column type (First contact, Number captured and appointment columns, for example; AI and automations find the column by this type even if you rename it) and Hide from reps (non-managers don't see this column). Most cards shown in the column sets how many cards load into the column when the board opens (100 if left empty, between 50 and 5000). If the column holds more, the most recently active cards load first; the rest come a hundred at a time with Load more at the bottom of the column. The count in the column header is always the column's real number of cards; while a filter is on it counts only the loaded cards that match, because filters don't search cards that aren't loaded yet. An opportunity moved into a Cancelled (excluded from revenue) column counts as lost: it drops out of revenue and open opportunities, and you're asked for a loss reason and whether the linked sale's money was refunded; its linked Finance sale is cancelled too (see Finance). Moving a Won opportunity to Lost asks the same question and cancels the sale too. It doesn't clash with a separate Lost column on the same sales flow. Under Which columns can't move opportunities into this one?, the other columns of the same sales flow you select turn red; opportunities in those columns can't be moved into this column by hand. The rule is one-way: opportunities in this column can still move anywhere. For example, select Numara Alındı on the İlk Temas column and an opportunity whose number was taken can't be dragged back to İlk Temas. AI and automations ignore this rule.
- Required fields: fields asked when an opportunity is moved here manually. The fields listed are the opportunity's additional info; the Settings › Sales & CRM › Sales CRM › Additional info link in the description opens that page in a new tab so you can add or delete fields. Under Opportunity details you can also require the opportunity's own details (Customer name, Phone, Email, Appointment date) without creating an extra field. If the opportunity already has the detail (for example a number that came from WhatsApp), it is filled in the window; otherwise it is asked and what you type is saved on the opportunity itself. Required fields are only asked on manual moves; opportunities moved by the AI or automations don't wait for them. Under Follow-up form, pick which follow-up details are asked one by one (for example only Owner); All selects every one. With a selection, moving an opportunity into this column opens the same window as Move to follow-up in the opportunity panel, showing only the selected details. In a column whose name contains "Takip" or "Takibi" (for example Üye Takibi) or whose type is Follow-up, the whole form is asked if nothing is selected. The fields you pick appear under Selected fields; turn Required off and the field is asked but can be left empty (for example an informational Görüşme notu). Anyone whose role has the Sales CRM › Assign permission (including Rep in the default roles) can pick the owner; without it the field is greyed out and they are recorded as the owner.
- Automations: what happens when an opportunity enters this column (message, assignment, reminder) is now set up as an automation; the templates on this tab open the flow builder with this column selected. See Column automations.
- AI: with AI can move opportunities to this column on, AI reads the conversation and moves the opportunity here if the column's name and description fit. Write a clear description (for example "Called but couldn't reach"). An opportunity whose number is captured in the chat goes to the column with "numara" or "telefon" in its name; if there is none, to the column whose description says the number was received (for example "Kişi telefon numarasını paylaştı"). On WhatsApp the number is already known, so the opportunity moves to this column as soon as the person first writes. AI can move opportunities to this column must be on for this move; opportunities further along or closed are not pulled back. AI also doesn't move an opportunity with a known number back behind this column. AI doesn't pull an opportunity that has an appointment back to an earlier column just because the chat goes on; if the customer writes that they cancel the appointment, the upcoming appointment is cancelled and the opportunity goes back to a fitting column (for example İlk Temas). If AI moves the opportunity to a lost column, its pending appointments are cancelled too.
When deleting a column, you choose where its opportunities go. Columns with a type can't be deleted, because AI and automations find a column by its type; to delete one, remove its type on the General tab first. A column without a type can be deleted whatever its name. If no column has a given type, the steps that rely on it don't run; new cards land in the first column. New sales flows come with Üye Takibi (the follow-up column); saving Follow up in the opportunity window moves the opportunity there. New sales flows don't have an AI Görüştü column; if an older sales flow has one, it can be deleted, and opportunities the AI has talked to then stay in İlk Temas.
Column automations
The lightning button in the column header shows that column's automations; the number next to it is how many are on. In the window:
- Automations tied to the column are listed; click a name to open the flow, use the switch to turn it on or off.
- If AI can move opportunities to this column is on, an AI moves matching opportunities here line shows with the column description.
- The templates under Add automation open the flow builder with this column selected:
- Message on entering a stage: a message goes to the contact when the opportunity enters this column.
{{contact.first_name}}is replaced with the contact's first name. - Remind if no reply: if the customer hasn't written 1 day after the opportunity enters the column, the owner is notified.
- Assign from pool: the opportunity goes to the next rep in the auto-assign pool.
- Alert on idle opportunities: if an opportunity stays in the column for 3 days, its owner is notified.
- Message on entering a stage: a message goes to the contact when the opportunity enters this column.
Sales flow automations without AI are available on every plan, don't count toward your plan quota and use no credits. If the opportunity has no conversation, or more than 24 hours have passed since the customer's last WhatsApp message, the message isn't sent; the result is written to the opportunity's history. Details: Automations.
Customer temperature
Give opportunities 1–5 stars to mark how interested a customer is; the opportunity shows a Hot / Warm / Cold badge. Set which star counts map to each temperature under Settings › Sales & CRM › Sales CRM › General; the ? icon next to the interest filter on the Sales CRM page shows the current thresholds. On the same page, define the follow-up reasons offered in the follow-up form and, under Contact status, how many days after the last won opportunity a customer with no open opportunity turns Inactive (see Customers and import). The Additional info section lists the extra details collected on an opportunity (opportunity custom fields): delete one you don't need with the trash icon (its saved answers are deleted too; if the field is required in a column, that requirement goes as well, and the confirmation lists those columns by name), and add anything you want to collect with New field. For merging fields and ready-made field templates, Detailed edit opens the Custom fields page.