
Social media
Image studio
Create social media images and captions with AI based on your brand kit; manage templates.
Social Media › Studio prepares on-brand post images and captions with AI. The text and logo in the image are not drawn by AI; the template draws them. That's why Turkish text never breaks and your logo and colours are always right.
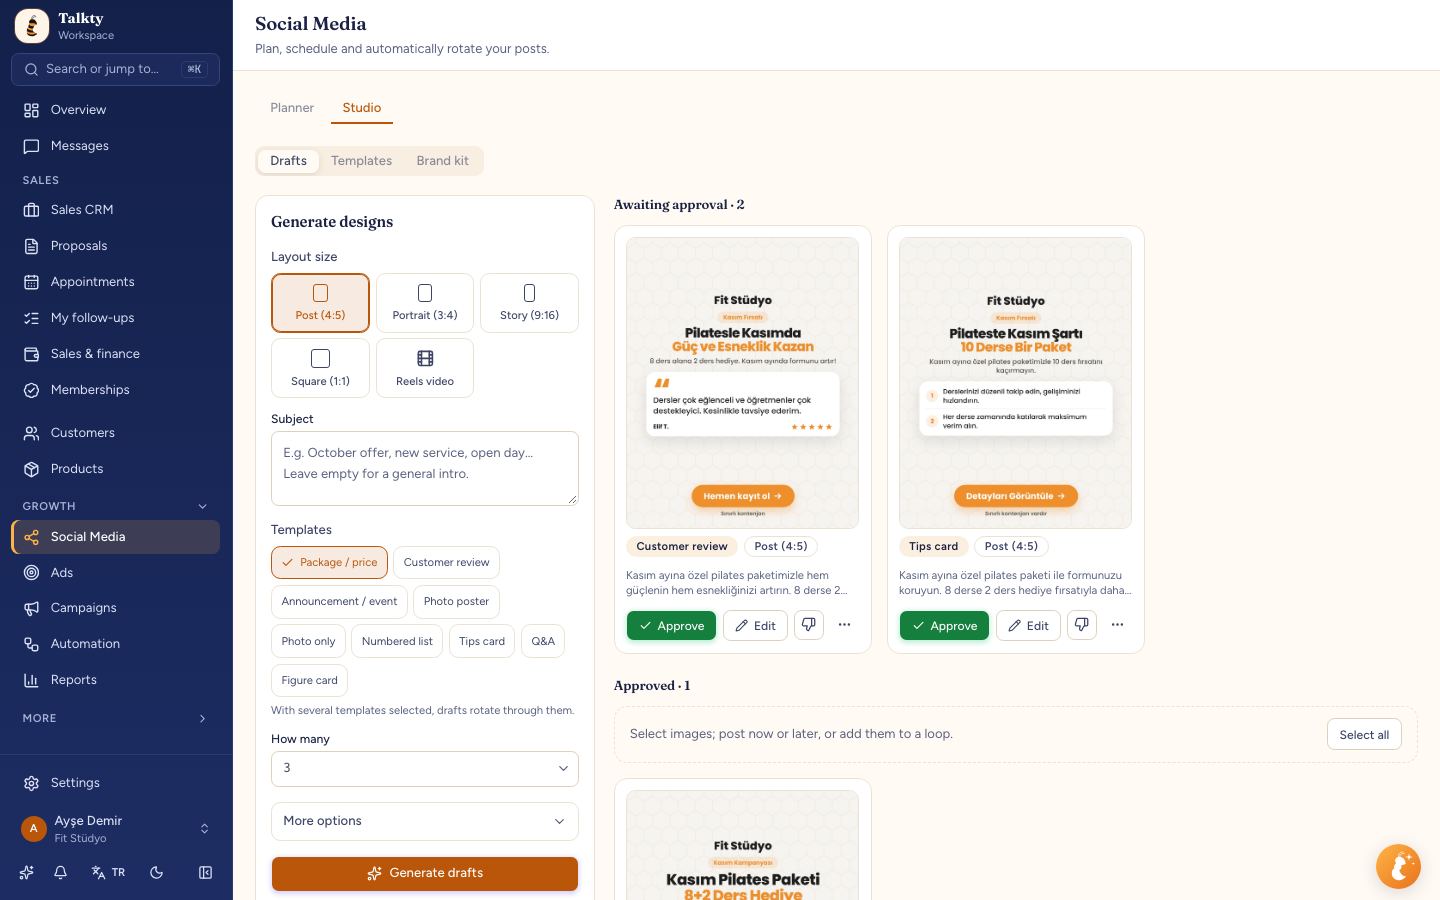
The studio has three tabs at the top: Drafts, Templates and Brand kit (the mascot lives here too). Drafts has the Generate designs form on the left and a gallery on the right: Awaiting approval designs first, Approved below; on a phone the form sits on top and the gallery below. Content the autopilot holds for your approval also shows up under Awaiting approval; the Autopilot button at the top right takes you to the Loops tab where you turn it on. You can prepare designs in the studio before connecting a social media account; you need one to publish.
Where do I make a Reels video? In Drafts › Generate designs › Layout size, choose Reels video. Details: Reels video.
1. Brand kit
First switch to Brand kit at the top and fill in the brand kit; AI copy and images are based on it. The same details can also be edited in Settings › Business profile:
- A short tagline, industry, target audience, what you do (the information AI uses most), website, phone, address.
- When an industry is chosen, AI's sample button texts, list items and AI photo scenes are tailored to your business (clinic, beauty, food & drink, real estate, consulting…).
- Main brand colour, tone of voice (friendly, corporate, energetic…), the default button text, hashtags.
- Logo (transparent PNG recommended) and logo size.
- Photos: business photos used as backgrounds in photo templates. Choose photos without text (your workplace, your products). You can also generate a photo with AI.
If you have a website, you can fill in details from it automatically.
Knowledge bank
The Knowledge bank section below the brand kit sets what the AI relies on and what it avoids. Empty sections aren't used; if all are empty, the AI writes as before, using only the brand details above.
- Form of address: address readers informally (sen) or formally (siz). With Not set, the AI decides based on your tone of voice.
- Verified facts: exact facts posts may mention (services, packages, durations, opening hours, years of experience), up to 60 items. Each item has a source: a web address or Business statement. Numbers and statements written here don't trigger the made-up content warning on drafts. Suggest from website brings a list of suggestions from your website. You add the correct ones one by one with Add; suggestions you don't add aren't used.
- Never write: one claim or phrase per line (e.g. "the only one in the industry", "guaranteed results"). The AI doesn't write or imply them.
- Worn-out angles: messages you've used too often and no longer want. Give each angle a name and list its words separated by | (e.g. "save time | save hours").
- Topic pool: topics you want to post about. When picking topics, the autopilot takes unused ones first and writes the date next to each topic it used.
- Dislikes: complaints you wrote with I don't like this; the last 20 go to the writer and the auditor. You can edit or delete them; changes save right away. Items turned into rules show a Made a rule badge.
- Pronunciation dictionary: words that should be pronounced differently in voiceovers (brand name, abbreviations). The written text stays as is.
The knowledge bank is saved with the rest of the brand kit when you click Save.
Mascot
In the Mascot section at the bottom of the Brand kit tab you create your brand's mascot. Once locked, the mascot is always drawn the same way in AI backgrounds while Use mascot is on.
- Give it a Name and describe the character in What kind of mascot? (e.g. "a small smiling bee, flat vector, orange and black"). If you have a sketch, pick it as the Reference image. Click Generate 3 candidates; your brand colour and business are taken into account. If you don't like them, ask for new ones with 3 more candidates.
- On an image you like, click Make variants and write what should change (e.g. "bigger eyes"). Three variants are drawn using that image as a reference. Repeat as many rounds as you like; each variant shows the note you gave. Mark favourites with Pick; use I don't like this to say what you don't like.
- When you're happy, click Lock. A mascot card is made from the image (fixed English description, colours, what never changes, what's not allowed, a rule for hands and objects) and a reference sheet is drawn (front, three-quarter, expressions). The first locked mascot becomes the Default.
A locked mascot's card doesn't change; to change it, click Unlock, edit the card and Save, then Lock again. An unlocked mascot isn't used in images. If you have several mascots, choose which one is used with Make default.
Use mascot: appears in the Generate designs form and in autopilot (when there's a locked default mascot). When on, the background is drawn by AI using the mascot's card and reference sheet (extra image charge). With the AI auditor on in autopilot, the drawing is also checked against the character on the card. If the same mascot complaint comes up twice, adding it to the card's rules is suggested.
2. Templates
A template decides how the image looks: layout, colours, typeface and which texts appear. Not the content. You manage templates under Templates at the top.
Built-in templates: package/price, customer review, announcement/event, tips card (a heading and 2-3 short numbered tips), Q&A (a question customers often ask and its answer), figure card (one big number or rate and what it means; AI writes the number only if it's in your data), photo poster (full-page photo, logo on top, big text on a coloured band below), photo only (no text on the image, just the photo and logo; the whole content, e.g. lists and explanations, goes in the post caption), numbered list (your brand kit photo as background, a heading and 3-5 items on top; each item has a heading, a sentence and a small note or translation. E.g. "5 reasons to choose us", or "5 words of the day" for a language course: word — meaning, example sentence, translation. With new AI backgrounds off in the autopilot, the same photo is used every day and only the text is generated). The chat card, inbox and all channels templates, which show a messaging assistant, are hidden in new accounts; turn them on with Restore removed built-in templates. You can also delete built-in templates you don't want and bring them back with the same button.
Three ways to create your own template:
- From a sample image: press Free design and, in the window that opens, upload a post image you like with From a sample image. It is turned into a free design and opened in the editor: text position, size, colour and spacing are measured, and the photo is cleaned of text and logo and used as the background (details below, under Free design).
- AI template: write a short description ("simple, white background, big headline").
- Copy and edit: copy a built-in template and change it. To copy one of your own templates (free designs included), press the Make a copy icon on its card; a new template named "(copy)" appears.
Edit opens a full-screen editor: the top bar has the template name (click to rename), an unsaved-changes marker, Cancel and Save; the large preview sits in the middle (switch between Post, Portrait, Story and Square above it); settings are on the right in collapsible groups (Layout and background, Text style, Colours, Background photo, Visible elements, Character limits). Only the settings the selected layout uses are shown (e.g. numbered list has no button, description, top label, footnote, background type or alignment):
- Layout, background (solid, gradient, honeycomb, photo) and colours.
- Headline layout: two separate lines (second line in the accent colour) or single headline · 1/2/3 lines (AI writes one sentence, split over the lines).
- Typeface: Poppins, Montserrat, Playfair Display, The Seasons, Oswald, Bebas Neue.
- Alignment: centred or left. Text size: small, normal or large (with large, AI writes shorter text so it fits).
- Photo darkness: on photo poster, photo only and numbered list; darken a bright photo so the text stays readable.
- Which texts appear: logo, button, second headline line, description, top label and footnote can each be turned on or off. A text that's turned off isn't written by AI or drawn on the image.
- Character limits: set the maximum characters for each text field (headline, list items, card texts…). An empty field uses the default limit (the faded number in the box). AI writes to this limit and longer text is cut at the last word; very long text may not fit the image, so check the preview. In free design it's set for every box AI writes.
- Background photo: shown on photo poster, photo only, numbered list and templates with a photo background. The photo you pick is always used for this template; if empty, the brand kit photos are used. E.g. copy "Numbered list" five times and pick a different photo for each to get five templates with different backgrounds.
Free design
When the ready-made layouts aren't enough, build the image yourself, Canva-style, with Templates › Free design. The editor opens full screen: the top bar has the template name, Cancel and Save; Add element and Layers are on the left; the canvas is in the middle (it grows to fit your screen height) with undo / redo, the size switch and keyboard shortcuts above it; the selected element's settings are on the right in collapsible groups (Content and source, Text style, Colour and effects, Position and size):
- Pick a starting point: Blank canvas, Photo poster, Centred headline, Half photo, List or From a sample image. Upload an image you like, e.g. one downloaded from Canva as PNG. AI recognises its text blocks and lines, the logo, a frame, a glow spreading from a corner and the photo. Text position, size, weight, colour, letter spacing and line height are measured from the image, so texts come in at the same place, size and colour. The thin frame's position and thickness, the logo's box and the glow colour are measured too. The background is the sample's own photo: the areas under the texts, logo and frame lines are erased and filled, the rest of the photo stays as it is. A glow spreading from a corner is taken out of the photo too and sits on top as a separate layer in the template; its strength and how it fades are measured from the sample. So the same glow comes in when you pick another photo; you can change its colour and opacity on the element. The sample's texts appear as Sample text in the template preview; when drafts are generated, AI writes new copy of the same length in their place. Limits: the typeface is matched to the closest of the six supported fonts; if a text blends into a busy photo and cannot be measured, it comes in with AI's estimated box and you can adjust it by hand.
- Add Text, Image, Logo and Shape elements from Add element on the left. Drag them and resize from the bottom-right corner; for an exact size, type Width (px) and Height (px) in the selected element's settings (post canvas 1080×1350, story 1080×1920). A Logo is added at its own aspect ratio and pixel size (e.g. a 406×338 logo comes in at 406×338; scaled down to fit if it is larger than the canvas), with Keep proportions on. An element snaps to the centre or edges of the canvas, or to the edge or centre of another element, and a thin guide line appears; hold Alt to move freely without snapping. When selected, nudge with the arrow keys or delete with Delete. A small toolbar appears right above the selected element: bring forward, send backward, duplicate, lock and delete. Type the exact position of the selected element in From left (px) / From top (px), and turn it with Rotate. The eye icon in the layer list hides an element (it is not drawn and AI writes or draws nothing for it); the lock icon locks it (it cannot be moved, resized or deleted).
- Undo / redo: the arrows above the canvas, or ⌘Z / Ctrl+Z and ⇧⌘Z / Ctrl+Y. ⌘D duplicates the selected element, ⌘C / ⌘V copy and paste it (inside a text field these shortcuts act on the text).
- If you close the window without saving, you get a warning; your changes are only lost when you choose Close without saving.
- For each element choose where the content comes from:
- Text: AI writes it (describe what to write, e.g. "campaign headline"; a character limit based on the box size is shown), Fixed text or From the business profile (business name, tagline, phone, website, address, button text).
- Image: AI draws it (a new photo for every draft from the description and topic), Photo from the library or Business logo.
- Typeface, size (same unit as Canva: text that is 60 in Canva is 60 here too), weight, letter spacing (thousandths of an em, as in Canva: 100 = 10% of the letter height; negative values tighten), line height (a multiple of the text size, default 1.15), colour (the dots next to the colour box are the template's and your brand's colours; one click applies them), uppercase (Turkish rules: i → İ), alignment and a coloured strip behind text; fill colour, opacity (0 = no fill, border only), gradient (the fill fades out towards the chosen side; the Glow options spread the colour softly in every direction from a corner or the centre, like sunlight, with no visible edge; e.g. a warm glow from the top left over a photo), border width and colour for shapes; corner radius (0 = sharp corners). With Keep proportions on, the element keeps its shape in every size (a circle stays a circle).
- Click an empty spot, or Background in the layer list, to open the background settings on the right: solid colour, gradient or photo (the photo you chose, your business photos in turn, or let AI draw it for each draft), photo darkness; below them Colours (accent and text colour, the template typeface) and Character limits.
You design once; switch the preview between Post, Portrait, Story and Square to see how it looks in each size. When drafts are generated, AI elements are written and drawn anew every time; fixed and profile elements stay the same. Each image drawn by AI adds an image AI charge.
3. Generating drafts
In the Generate designs form on the left:
- Layout size: press one of the five tiles: post (4:5), portrait (3:4), square (1:1, for Facebook and square posts), story (9:16) or Reels video (a short 9:16 video; see below).
- Subject: what you want to say (for example "October campaign").
- Choose one or more templates.
- Choose how many.
- If needed, open More options:
- Package / product: click the box and type part of the name; your picks show as buttons below, press one to remove it. Prices come from your data and AI never makes prices up; if the product is on sale, the text reads like "₺1,500 instead of ₺1,200" (in Turkish copy: "₺1.500 yerine ₺1.200"). If the product has an image (from your store or the Image URLs in the product form), photo templates use it as the background; with several products, drafts take their images in turn. If the image can't be downloaded (not JPG/PNG, or the address doesn't open), your brand photos are used.
- Carousel post (post size only): choose a slide count instead of Single image (5-10 slides) to prepare a swipeable post. The cover uses the template you pick; inner slides deliver the cover's promise step by step, each with a heading, short text and a slide number; the last slide wraps up with a button. Inner and closing slides use the cover's colours and font. The draft card shows the slides as thumbnails; it's posted as a carousel (to add it to a loop, the loop must be of type carousel). A Regenerate note applies to all slides; Edit changes only the cover. The same list also has Panorama (3 tiles, one image in the grid): one wide scene is drawn by AI (with your mascot if selected) and split into three tiles. On your profile they sit side by side like one image; in the feed each tile stands on its own with its own heading and caption. The draft card shows the three tiles as they'll look in the grid. When you post, the tiles go out in 3 → 2 → 1 order three minutes apart so they line up left to right in the grid; a panorama can't be added to a loop. If you pin them, pin in 3 → 2 → 1 order too.
- Generate the background with AI: Each draft gets a fresh, text-free photo matching its topic. This adds an image AI charge per draft and takes longer.
- Use mascot: shown when you have a locked default mascot.
- Press Generate drafts. The drafts appear on the right under Awaiting approval. Below the button you can see which AI makes the content: Talkty AI (uses tokens) or the provider you chose with your own key. Change opens the AI providers settings.
Reels video
Choose Reels video under Layout size and the form shows Number of scenes (3-6) and Voiceover. Each scene has an AI drawing matching the topic (with your mascot if selected), a slow zoom, line-by-line word-by-word highlighted captions (in your brand colour) and a closing card at the end. With Voiceover on, each line is voiced separately; the brand kit's Pronunciation dictionary is applied to the voice while captions stay as written. Each line's audio is transcribed and checked; a line that doesn't match is voiced once more, and if it still doesn't match the draft shows a warning. Videos are 15-60 seconds and are edited in a cloud service; the draft card first shows Preparing video… and the video arrives a few minutes later. You can't change a Reels with Edit; use Regenerate with a correction note. It's posted as a Reels. Reels only work with your own Shotstack key; without one, the form explains how to get it (Getting a Shotstack key).
4. Review, edit and publish
The gallery on the right lists Awaiting approval · N designs first and Approved · N below. Each card shows the image and the first lines of the post caption.
- Approve: the draft moves to Approved.
- Edit: change the texts, caption, typeface and logo position; then Save and redraw.
- The thumbs-down icon (I don't like this) asks what you don't like (text or image). The AI won't repeat it in future content, and the autopilot's auditor checks for it too. If the same complaint comes up a second time, you're asked Turn this into a permanent rule?: if you agree, it's added to the brand kit's Never write or Worn-out angles list or to the auditor's extra rules; you can edit the text first. The same button is also in a post's details in the Planner.
- The ⋯ (More actions) menu holds:
- Regenerate with a fix: write something like "make the headline shorter" and let AI rewrite it.
- Use in an ad: opens the new ad wizard in Ads with this image selected (Creating an ad). If no ad account is connected, the Ads page opens.
- Delete: deletes the draft.
- On Approved cards press Pick (or Select all above them). Once something is picked, a publish box opens at the top: publish now, schedule for later or add to a loop. An approved card's ⋯ menu has Move back to drafts and Use in an ad.
- If a number not found in your data (such as a discount rate or "30% more") or an unbacked claim (such as "guarantee" or "best") was written, the draft shows a warning; check and fix it. No warning appears when these appear in your data (brand kit, product description, topic).
The studio uses AI tokens. See Plans, tokens and subscription. To create content with your own OpenAI, Gemini or Higgsfield key without using tokens, see Use your own AI key.